Authentic Methi Thepla Recipe

Authentic Methi Thepla Recipe

Introduction

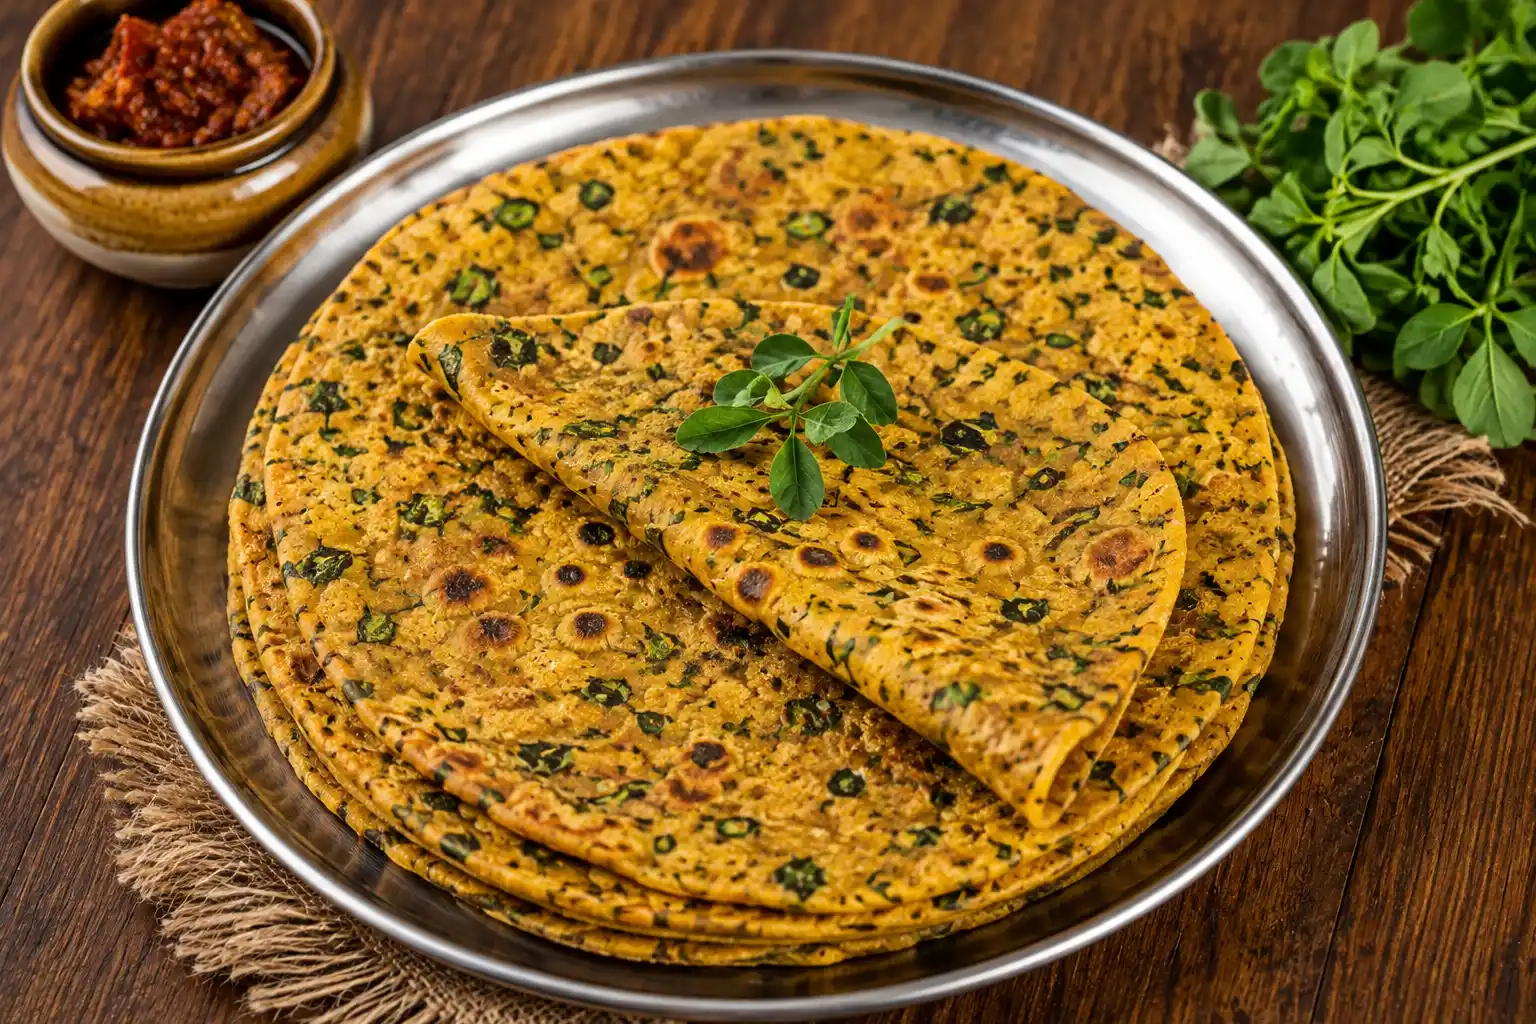
Imagine walking into a kitchen filled with the warm, earthy scent of roasted fenugreek, toasted spices, and a hint of caramelized yogurt sizzling on a hot iron griddle. That is the magic of a freshly made Methi Thepla. This classic Gujarati flatbread is soft, paper-thin, slightly bitter from the fresh greens, and wonderfully spiced. It is the kind of food that wraps you in a warm hug, whether you are eating it hot off the stove or pulling it out of a foil wrapper during a long train journey.

For beginners, working with fresh greens in a dough can feel a little intimidating. You might worry about the bitterness of the methi or struggle to get that perfect, paper-thin roll without the dough tearing. Don’t worry—I am going to walk you through every step of the process. If you love mastering classic Indian breakfast staples like a crispy Masala Dosa Recipe, adding these soft, spiced flatbreads to your culinary repertoire is an absolute must.

The secret to a perfect thepla lies in the balance of textures and the quick, high-heat cooking method. We use a touch of chickpea flour (besan) for nuttiness and yogurt to keep the crumb incredibly soft. Let’s head to the kitchen and learn how to make these gorgeous flatbreads together.

Why You’ll Love This Recipe

  • Incredibly Travel-Friendly: Because of the yogurt and oil in the dough, these flatbreads stay soft and fresh for up to 3–4 days without refrigeration.
  • Packed with Fresh Greens: It is a delicious, sneaky way to get a healthy serving of iron-rich fenugreek leaves into your daily diet.
  • Wonderfully Forgiving: Unlike traditional rotis, the addition of fat and yogurt makes this dough very easy to roll out, even for absolute beginners.
  • Meal-Prep Friendly: You can knead the dough ahead of time or freeze the cooked theplas for an instant, warm breakfast on busy mornings.
  • The Ultimate Flavor Balance: The subtle bitterness of methi is beautifully balanced by warm turmeric, spicy chili, and a touch of sweet yogurt.

Ingredients

  • 100 grams fresh methi (fenugreek) leaves (washed, completely dried, and finely chopped)
  • 1.5 cups atta (whole wheat flour) (plus extra for dusting)
  • 3 tablespoons besan (gram flour) (adds nuttiness and keeps them tender)
  • 0.5 teaspoon turmeric powder (for a beautiful golden hue)
  • 1 teaspoon kashmiri red chili powder (for gentle heat and color)
  • 1 teaspoon coriander-cumin powder (dhana jeera) (ground spices)
  • 0.5 teaspoon ajwain (carom seeds) (crushed between palms)
  • 3 tablespoons plain yogurt (dahi) (whisked until smooth)
  • 1 tablespoon cooking oil (plus extra for roasting the flatbreads)
  • 0.75 teaspoon salt (adjust to taste)
  • 0.25 cup lukewarm water (added gradually as needed to knead)

How to Make

Step 1: Prep the Greens

Ensure your 100 grams of fresh methi leaves are washed, dried completely on a kitchen towel, and chopped very finely. Any excess water on the leaves will make the dough sticky later.

Step 2: Combine Dry Ingredients

In a large mixing bowl, combine 1.5 cups atta, 3 tablespoons besan, 0.5 teaspoon turmeric, 1 teaspoon red chili powder, 1 teaspoon coriander-cumin powder, 0.5 teaspoon crushed ajwain seeds, and 0.75 teaspoon salt. Whisk together to distribute the spices evenly.

Step 3: Add Wet Ingredients and Greens

Add the finely chopped methi leaves, 3 tablespoons whisked yogurt, and 1 tablespoon oil to the flour mixture. Rub the mixture between your fingertips until it resembles coarse breadcrumbs and the methi is well incorporated.

Step 4: Knead the Dough

Gradually add lukewarm water, a tablespoon at a time, and knead until a smooth, soft, and pliable dough forms (similar to the texture of a soft earlobe). Cover with a damp cloth and let it rest for 15 minutes.

Step 5: Divide into Portions

After resting, give the dough a quick 30-second knead. Divide the dough into 8 equal-sized balls, rolling them smooth between your palms so there are no cracks.

Step 6: Roll Out Paper-Thin

Dust a dough ball lightly with dry wheat flour. Using a rolling pin, roll it out into a thin, even circle of about 6-7 inches in diameter. Dust with a tiny bit of extra flour if it starts to stick, but avoid using too much dry flour.

Step 7: Preheat the Tawa

Heat a heavy-bottomed tawa or griddle over medium-high heat. Test the heat by sprinkling a pinch of flour; if it turns brown in a few seconds, the pan is hot enough.

Step 8: Cook the Thepla

Place the rolled thepla on the hot tawa. Cook for 30-40 seconds until you see tiny bubbles starting to surface on top. Flip it over.

Step 9: Apply Oil and Sear

Drizzle half a teaspoon of oil over the surface, spreading it evenly with the back of a spoon. Flip again and apply oil to the other side. Press down gently with a spatula, cooking for 20-30 seconds per side until beautiful golden-brown spots appear. Do not overcook or it will turn crunchy.

Step 10: Serve or Store

Remove the cooked thepla from the pan and place it in a cloth-lined basket. Repeat with the remaining dough balls. Stack them hot to keep them wonderfully soft, then serve warm or cool for storage.

Chef’s Tips

  • 💡 Chef’s Tip: Roll with a light touch: Start from the center and roll outwards. Let the rolling pin do the work so you don’t squash the air bubbles that help the flatbread puff.
  • 💡 Chef’s Tip: Keep the heat medium-high: Cooking theplas on low heat evaporates all their moisture, turning them into hard crackers. You want a quick sear to keep them soft.
  • 💡 Chef’s Tip: Rest the dough: Always give your kneaded dough at least 15 minutes to rest. This relaxes the gluten, making the rolling process infinitely easier and preventing the dough from springing back.

Common Mistakes to Avoid

  • Using wet fenugreek leaves: This releases excess moisture during the dough resting phase, making it sticky and requiring too much extra dry flour to roll, which toughens the flatbread.
  • Rolling them too thick: Unlike parathas, theplas should be thin and delicate. Thick theplas take too long to cook and become chewy.
  • Using too much oil during kneading: While some oil is essential for softness, too much will make the dough greasy and heavy, preventing it from puffing properly.
  • Skipping the yogurt: Yogurt provides the acidity needed to tenderize the gluten; skipping it results in flatbreads that dry out within a few hours.

💡 Before You Start

Before you even touch the flour, promise me you will wash and completely dry your methi leaves. Moisture is the hidden enemy of a perfect thepla dough. If the leaves are wet when you chop them, they will release too much water when mixed with salt, turning your dough into a sticky, unrollable mess. Lay them out on a clean kitchen towel to dry after washing, then chop them finely.

Variations

1. Kasuri Methi Thepla: If you cannot find fresh fenugreek leaves, substitute them with 3 tablespoons of dried fenugreek leaves (kasuri methi). Soak them in warm water for 5 minutes, drain completely, and add to the flour.

2. Vegan Thepla: Simply replace the dairy yogurt with an equal amount of water mixed with a squeeze of lemon juice, or use a plain, unsweetened plant-based yogurt like coconut or almond yogurt.

3. Garlic & Chili Thepla: Crush 3-4 cloves of garlic and 1 green chili into a fine paste and knead it directly into the dough for an extra punch of spicy, savory warmth.

Serving Suggestions

For a Quick Breakfast: Serve warm theplas folded into triangles alongside a hot cup of ginger masala chai and a side of sweet mango pickle (Chhundo).

For a Wholesome Lunch: Pack them in a lunchbox with a simple potato stir-fry (Aloo Bhaji) and a small container of plain yogurt.

For a Cozy Weeknight Dinner: If you want to turn this into a hearty dinner, try serving these flatbreads alongside a rich and saucy Egg Curry Recipe.

As a Travel Snack: Cool the cooked theplas completely, stack them, wrap them tightly in aluminum foil, and store them in an airtight container to enjoy on road trips or flights.

Storage

Allow the cooked theplas to cool completely to room temperature. Stack them with a piece of parchment paper between each flatbread to prevent sticking, then wrap the stack tightly in foil and place in an airtight container. They will keep perfectly at room temperature for 3 to 4 days, or in the refrigerator for up to a week. You can also freeze them for up to 3 months.

Reheating

To reheat, place a dry tawa or skillet over medium-high heat. Warm each thepla for 15-20 seconds on each side until heated through and soft. Avoid microwaving them without a damp paper towel, as they can quickly turn dry and rubbery.

Frequently Asked Questions

Why did my methi theplas turn out hard and crispy?

This usually happens if you roll them too thick, cook them over low heat for too long, or don’t use enough fat (oil/yogurt) in the dough. Cook on medium-high heat quickly to lock in the moisture.

Can I use dried fenugreek leaves (kasuri methi) instead of fresh?

Yes! If fresh methi is unavailable, soak 3 tablespoons of kasuri methi in warm water for 5 minutes, squeeze out all the water thoroughly, and add it to the flour mixture.

How do I prevent the dough from getting too sticky?

Make sure your fresh methi leaves are completely dry before chopping and kneading. Also, add water very gradually since the greens and yogurt will release moisture as you knead.

Is methi thepla healthy?

Yes, it is very healthy. It uses whole wheat flour, fiber-rich and iron-packed fenugreek leaves, and minimal oil. It is a fantastic option for a nutritious breakfast or snack.

How long do these flatbreads stay fresh?

When prepared with yogurt and oil, they stay soft and delicious for up to 3 to 4 days at room temperature, making them a popular snack for long-distance travel.

Can I freeze thepla dough?

It is best to freeze the cooked theplas rather than the dough. Freeze stacked cooked theplas separated by parchment paper in a zip-lock bag. Reheat on a hot griddle when ready to eat.

Conclusion

Methi Thepla is more than just a simple flatbread; it is an introduction to the beauty of Gujarati home cooking. With its delicate balance of earthy spices, bitter greens, and tender crumb, it is a recipe you will find yourself returning to week after week. Grab your rolling pin, heat up your tawa, and enjoy the beautiful process of making these soft, aromatic flatbreads!

Recipe Index

Browse All Recipes →

More Recipes You’ll Love

Authentic Methi Thepla Recipe

A soft, spiced, and deeply comforting Gujarati flatbread made with fresh fenugreek leaves, whole wheat flour, and warm spices. Perfect for breakfast or travel!
Prep Time 20 minutes
Cook Time 15 minutes
Total Time 35 minutes
Servings: 8

Ingredients
  

  • 100 grams fresh methi fenugreek leaves (washed, completely dried, and finely chopped)
  • 1.5 cups atta whole wheat flour (plus extra for dusting)
  • 3 tablespoons besan gram flour (adds nuttiness and keeps them tender)
  • 0.5 teaspoon turmeric powder for a beautiful golden hue
  • 1 teaspoon kashmiri red chili powder for gentle heat and color
  • 1 teaspoon coriander-cumin powder dhana jeera (ground spices)
  • 0.5 teaspoon ajwain carom seeds (crushed between palms)
  • 3 tablespoons plain yogurt dahi (whisked until smooth)
  • 1 tablespoon cooking oil plus extra for roasting the flatbreads
  • 0.75 teaspoon salt adjust to taste
  • 0.25 cup lukewarm water added gradually as needed to knead

Method
 

  1. Ensure your 100 grams of fresh methi leaves are washed, dried completely on a kitchen towel, and chopped very finely. Any excess water on the leaves will make the dough sticky later.
  2. In a large mixing bowl, combine 1.5 cups atta, 3 tablespoons besan, 0.5 teaspoon turmeric, 1 teaspoon red chili powder, 1 teaspoon coriander-cumin powder, 0.5 teaspoon crushed ajwain seeds, and 0.75 teaspoon salt. Whisk together to distribute the spices evenly.
  3. Add the finely chopped methi leaves, 3 tablespoons whisked yogurt, and 1 tablespoon oil to the flour mixture. Rub the mixture between your fingertips until it resembles coarse breadcrumbs and the methi is well incorporated.
  4. Gradually add lukewarm water, a tablespoon at a time, and knead until a smooth, soft, and pliable dough forms (similar to the texture of a soft earlobe). Cover with a damp cloth and let it rest for 15 minutes.
  5. After resting, give the dough a quick 30-second knead. Divide the dough into 8 equal-sized balls, rolling them smooth between your palms so there are no cracks.
  6. Dust a dough ball lightly with dry wheat flour. Using a rolling pin, roll it out into a thin, even circle of about 6-7 inches in diameter. Dust with a tiny bit of extra flour if it starts to stick, but avoid using too much dry flour.
  7. Heat a heavy-bottomed tawa or griddle over medium-high heat. Test the heat by sprinkling a pinch of flour; if it turns brown in a few seconds, the pan is hot enough.
  8. Place the rolled thepla on the hot tawa. Cook for 30-40 seconds until you see tiny bubbles starting to surface on top. Flip it over.
  9. Drizzle half a teaspoon of oil over the surface, spreading it evenly with the back of a spoon. Flip again and apply oil to the other side. Press down gently with a spatula, cooking for 20-30 seconds per side until beautiful golden-brown spots appear. Do not overcook or it will turn crunchy.
  10. Remove the cooked thepla from the pan and place it in a cloth-lined basket. Repeat with the remaining dough balls. Stack them hot to keep them wonderfully soft, then serve warm or cool for storage.

Similar Posts

Leave a Reply

Your email address will not be published. Required fields are marked *

Recipe Rating